Blister Management 101.
With Melbourne’s active events calendar in full swing and winter approaching, there’s no better time to refresh your blister management plan.
Blisters form in response to something rubbing against the skin in the opposite direction. It’s a combination of frictional and shearing forces that causes the skins layers to come apart, our body then needs to protect and repair the area so there is a shift of fluid into the location; hence the painful fluid filled bubble that we all know too well…the blister!
Working out why a blister has formed can be straightforward or there can be a few elements intertwined together. The list that follows is an example of some of reasons we will see blister presentation:
- Shoes pulling down while the foot slides up (normally with newer shoes as they haven’t gotten their flexion point at the toes yet)
- Pivoting or twisting (this can happen at the forefoot or heel)
- Biomechanical overload/inefficiency
- Hyperhidrosis (excessive body moisture)
- Bony prominences/deformities
- Callous/Hard Skin (indicator of high loading area)
- Technique (Running and walking)
You might not have suffered from blisters when walking, running or participating in events before so we recommend you look out for red flags on your feet, especially if your KM’s are about to increase.
- Hot Spots- these are areas that feel ‘hot’ when you’re moving. They haven’t blistered yet but it’s your body warning you that there is a point of friction and increased force.
- Callous- already areas of high day to day loading (heels and ball of your foot) the thickened skin can blister deeper under the callous or around the area. A good idea to talk with your podiatrist.
- Bony Prominences- areas such as bunions, tops of toes or back of the heels they might be a little red or tender.
- • Hyperhidrosis (excessive body moisture)
- Sweat: look at your skin, socks and shoe liners.
Benjamin Franklin famously quoted “by failing to prepare, you are preparing to fail” this is particularly relevant to blister prevention! These are our tips to help you out:
- General foot health
- Keep nails short.
- Look out for macerated skin between the toes.
- Keep skin hydrated but not moist (find the balance).
- Ensure your shoe has been fitted correctly
- You might need to consider the use of lock lacing to draw the back of the shoe more firmly around your heel and stop some slipping.
- Don’t do the event in new shoes- make sure they’ve had a few weeks wear in.
- For more information on Shoe fitting refer to the blog post “Are running shoes making us weak? How do we choose?” http://www.upandrunningpodiatry.com.au/announcement/are-running-shoes-making-us-weak-how-do-i-choose/
- Socks
- Double socking works for some but it can also increase the amount of friction.
- If you’re going to purchase new socks look for one which has a technical fit (a tight band around the arch to hold it in place and/or a left and right foot fit). The sock should also have some antimicrobial and moisture wicking properties. Some good examples are: X-socks and Thorlo’s.
- For a cheaper option try and keep clear of ‘blend’ fibres. Look for 100% Wool or Cotton.
- Use of powders, sprays and solutions
- These are designed to reduce friction by either reducing the amount of moisture or allowing the skin to slide over the normally frictional surface.
- Common easy to use options are baby powder, body balm and antiperspirant deodorant (yes, on your feet!)
- Condy’s crystals are a solution that you can use but you should discuss the quantity with your podiatrist.
- Try and avoid vasoline type rubs- these have been proven to increase friction with long duration activity.
- Bandaid Preparation
- You most likely would have already noticed some hot spots on your feet, don’t ignore these! They’re your bodies’ way of pre-warning you.
- Use a hypoallergenic tape such as mefix or hypafix to buffer the area.
- This is handy for interdigital hot spots, you can use the taping method as shown below.
- Compeed can be handy but be warned! In some cases we’ve seen it get caught into the blister and when removing it gets messy. Probably something that’s better suited to day to day management but if you’re out running a marathon or completing the Oxfam trailwalker then might be best to adopt another method.
- You most likely would have already noticed some hot spots on your feet, don’t ignore these! They’re your bodies’ way of pre-warning you.
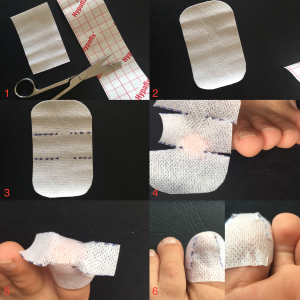
Method for hot spot toe taping with hypoallergenic tape:
1) Hypoallergenic tape and Scissors
2) Cut the desired length and round of the tape
3) Cut at the lines marked to make flaps
4) Adhere to tip of toe with square ends going along the inside and outside
5) Fix the top and bottom to the toe
6) Seal off the tape.
Make sure you don’t pop the blister. You risk infection and further break down of the skin.If you’ve left it a bit late and already have a blister or the management didn’t go to plan that’s ok!
- Dress it daily with a bandaid and betadine. You might need to consider some offloading such as donut padding or different shoes depending on the location.
- We would recommend coming to see your podiatrist if you’ve noticed some hot spots on your feet or there is a deep blister.
- Podiatrists can relieve your blisters in a sterile manner and keep the skin intact and safe
- Your podiatrist can look at offloading techniques such as felt, pads or mechanical correction and assess your technique and gait to give you a better idea of why particular areas are loading up and some tips to modify.
If you’ve signed up to some of the big events this year like the Oxfam trailwalker, the Salomon Trail series, the Great Ocean Road Marathon (or Ultra Marathon!) or maybe even your first family friendly event, make sure you prepare, listen to your body and look out for those hot spots. All of our arePodiatrists trained to help you with your blistering needs over the active period. Happy Running!